
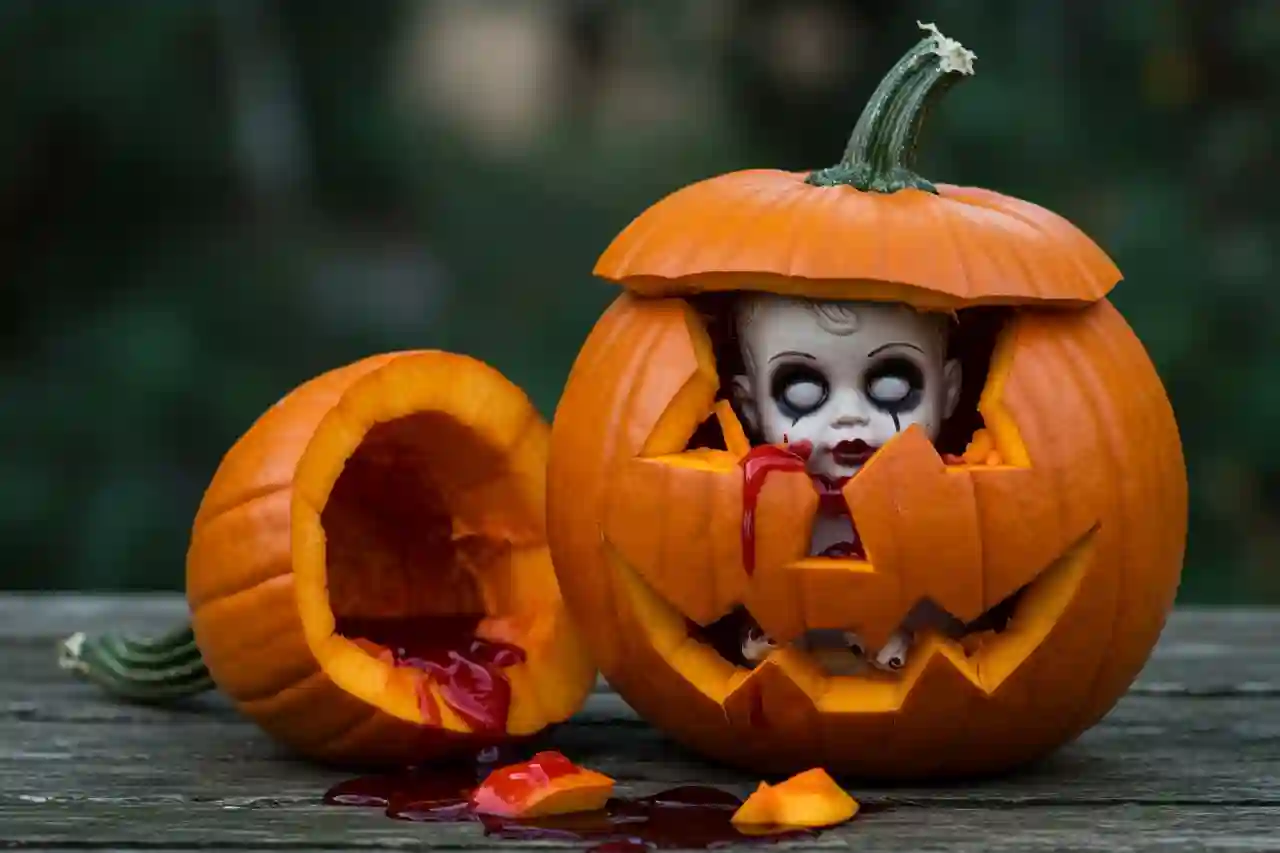
Searching for a pumpkin idea that is creepy, funny, and simple? Try zombie baby pumpkin carving. Unlike ordinary jack-o’-lanterns, this design makes it look as if an undead baby is bursting through your pumpkin. As a result, it creates a gory, unforgettable centerpiece without complicated carving skills.
Why You’ll Love Zombie Baby Pumpkin Carving
- This eerie display quickly grabs attention at any Halloween event.
- It’s beginner-friendly; therefore, you don’t need advanced carving techniques.
- It works perfectly for porch décor, parties, and trick-or-treat displays.
- You can customize with makeup, fake blood, or pumpkin guts.
- Supplies are inexpensive, and thrifted dolls work just as well.
- Kids can join in the non-carving steps; meanwhile, adults can handle the cutting.
- The finished project looks fantastic on Instagram and Pinterest.
Zombie Baby Pumpkin Carving Supplies
To get started, gather these items. According to the USDA FoodData Central, pumpkins are both fun to carve and full of seasonal nutrients.
| Craft Supplies | Fresh Items |
|---|---|
| Baby doll (cheap or thrifted) | Pumpkin (medium or large) |
| White face paint | Pumpkin guts & seeds |
| White or neutral eyeshadow | — |
| Purple or black eyeshadow | — |
| Fake blood (optional) | — |
| Carving knife | — |
| Toothpicks (optional) | — |
| Glue gun (optional) | — |

Substitutions
- Replace purple with gray or black eyeshadow.
- Instead of glue, use toothpicks to secure limbs.
- If fake blood isn’t available, syrup or ketchup works.
Step-by-Step Zombie Baby Pumpkin Carving
Learn how to create a creepy zombie baby pumpkin step by step. This simple guide shows you how to prep the doll, carve the pumpkin, position the baby, and finish with spooky details for a realistic horror effect.
- Step 1 – Prep the Baby Doll
First, coat the doll’s eyes with white paint. Then set the paint with eyeshadow to prevent smudging. Add dark shadow around the eyes to achieve a sunken, undead effect.
- Step 2 – Carve the Pumpkin
Next, cut an opening where the doll will appear. Scoop out seeds and guts, but keep some inside. This way, the mess enhances the gory look.
- Step 3 – Position the Doll
After carving, push the doll through the hole. If necessary, detach limbs and later reattach them using toothpicks or glue. As a result, the doll looks like it is tearing out of the pumpkin.
- Step 4 – Add Final Touches
Finally, place pumpkin guts around the doll’s entry point. For extra drama, drizzle fake blood along the edges.

Pro Tips for Creepy Pumpkin Carving
- For more impact, choose a misshapen pumpkin.
- Always cover your work surface to make cleanup easier.
- Add LED candles nearby; consequently, the effect glows at night.
- Keep the pumpkin shaded; otherwise, it rots quickly.
- Smaller pumpkins are great for creating zombie “twins.”
- Refresh the fake blood before guests arrive.
- Spray the inside with diluted bleach to delay spoilage.
- Take photos immediately; therefore, you’ll capture it before it collapses.
Creepy Pumpkin Carving Variations & Substitutions
- Kid-Friendly: Skip the fake blood and let kids paint instead.
- No-Carve: Attach doll limbs outside the pumpkin for a safer version.
- Budget-Friendly: Use secondhand dolls for unique results.
- Extra Spooky: Insert glow sticks inside for eerie lighting.
- Party-Ready: Pair the craft with Witch’s Brew Cocktail to impress guests.
Storage & Shelf Life
Carved pumpkins do not last long. Therefore, prepare them no more than two to three days before Halloween. Store them outdoors in cool spots, away from direct sunlight. To extend freshness:
- Spray the inside with diluted bleach solution (FDA Halloween food safety guide).
- Refrigerate overnight to slow bacteria growth.
- If mold appears, discard immediately. Safety comes first.
FAQs
Choose a simple design and enhance it with paint or props. Zombie baby pumpkins are easier than traditional faces and look more dramatic.
Painting, stickers, or glued props work well. No-carve designs are safer and last longer.
Cover it in black paint, add spiders, or drip red wax. A doll bursting out makes it terrifying with little cutting.
They typically last three to five days. Weather, heat, and moisture affect their lifespan.
Keep it shaded, spray bleach solution, and refrigerate overnight. However, never eat carved pumpkins after they’ve been displayed.

More Like This
- Halloween Pumpkin Pizza – festive dinner that doubles as spooky décor
- Halloween Mummy Hot Dogs Recipe – fun, kid-friendly food for gatherings
- Witch’s Brew Cocktail – magical drink to pair with creepy crafts
- Graveyard Pudding Cups – sweet dessert to shock your guests
- Black Velvet Cake – bold cake perfect for Halloween parties
Zombie Baby Pumpkin Carving Recipe
- Total Time: 20 minutes
- Yield: 1 pumpkin carving
Description
This creepy DIY Zombie Baby Pumpkin Carving is the ultimate Halloween centerpiece. A baby doll bursting out of a pumpkin, complete with guts and fake blood, makes for a terrifying yet hilarious decoration. With simple tools and affordable supplies, anyone can create this unforgettable Halloween project in under an hour.
Ingredients
- 1 medium or large pumpkin (preferably misshapen for creepiness)
- 1 baby doll (thrifted or budget-friendly)
- 2 tbsp white face paint (for eyes)
- 1 tsp white or neutral eyeshadow (to set paint)
- 1 tsp purple or black eyeshadow (for zombie effect)
- 2–3 tbsp fake blood (or ketchup/syrup alternative)
- 1 carving knife
- 1 glue gun (optional, for reattaching limbs)
- 4–6 toothpicks (optional, for securing doll)
- Pumpkin guts and seeds (saved from carving)
Instructions
- Prep the Doll – Paint the doll’s eyes with white face paint. Set the paint with neutral eyeshadow, then add dark shadow around the eyes for a sunken, zombie effect.
- Carve the Pumpkin – Cut an opening where the doll will “burst out.” Scoop out the inside, leaving some guts for dramatic effect.
- Insert the Doll – Push the doll into the opening. If necessary, detach and reattach limbs with toothpicks or a glue gun for positioning.
- Decorate with Guts and Blood – Arrange pumpkin guts around the doll’s exit point. Drizzle fake blood for a gory finish. Display immediately for best effect.
Notes
- Variations: Use glow sticks inside the pumpkin for an eerie glow.
- Substitutions: Replace fake blood with syrup or red paint.
- Shelf Life: Lasts 2–3 days; keep outdoors in cool weather.
- Kid-Friendly Version: Skip fake blood and use paint only.
- Prep Time: 20 minutes
- Cook Time: 0 minutes (non-edible craft)
- Category: Halloween Craft / Decoration
- Method: Carving + Assembling
- Cuisine: American
Save This Recipe for Later
Hosting a party soon? Pin this project to your Halloween board, share it with friends, or comment below with your pumpkin creations.