
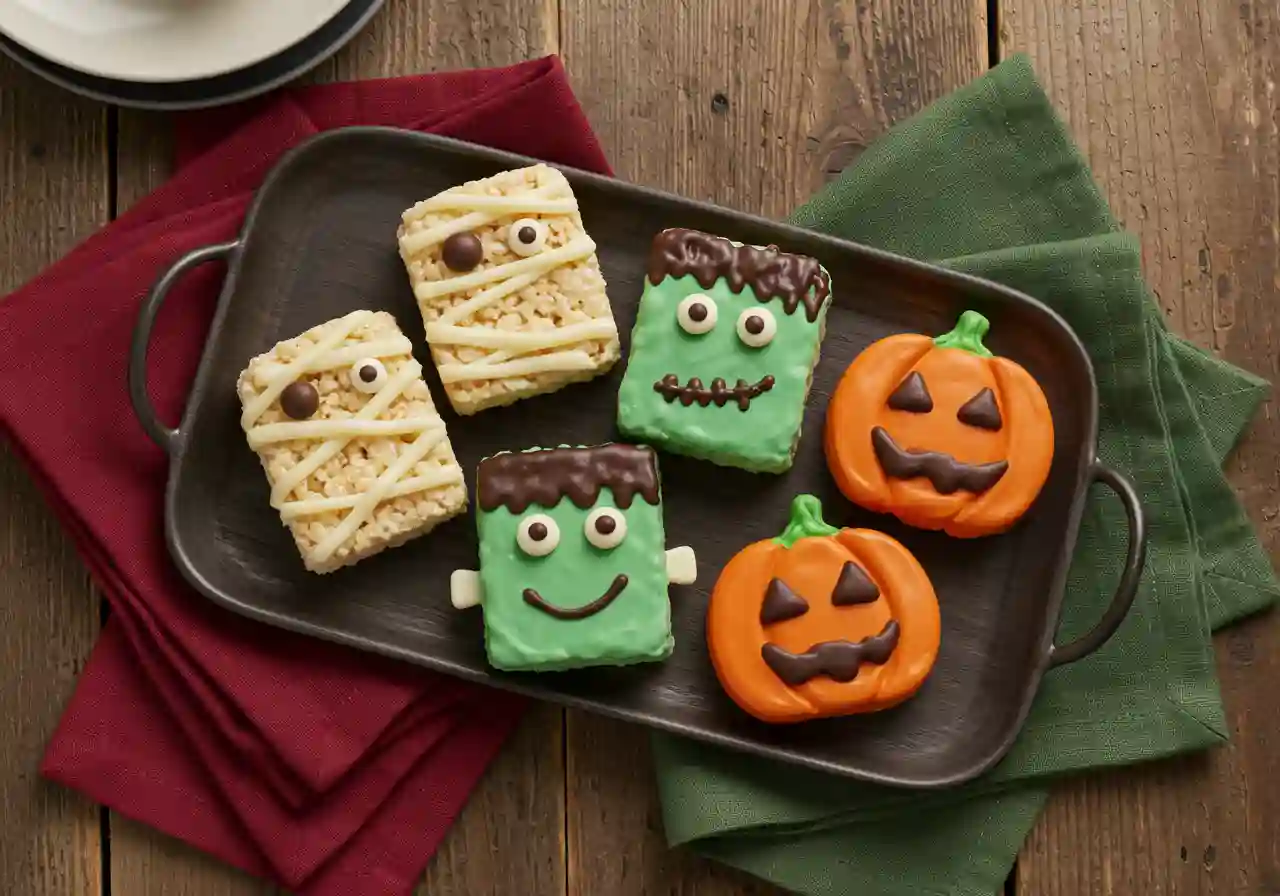
Halloween Rice Krispie Treats are crunchy, colorful, and fun to decorate. With four spooky designs, mummies, monsters, Frankenstein, and jack-o’-lanterns, they’re ideal for family gatherings or festive parties. These no-bake bars require minimal effort, yet the results always impress both kids and adults.
Why You’ll Love Halloween Rice Krispie Treats
- No baking required, quick preparation
- Four creative decoration ideas in one recipe
- Easily adapted for gluten-free or vegan diets
- Budget-friendly and family-approved
- Perfect for Halloween parties or school events
Ingredients
Pantry & Fresh
| Ingredient | Quantity | Notes |
|---|---|---|
| Rice Krispie Treats base | 2 batches | Cut into rectangles |
| Vanilla Frosting | 1 cup | For mummy bandages |
| Candy Eyes | As needed | Use mixed sizes |
| Black Piping Gel | 2 tbsp | For faces and details |
| Orange Food Coloring | Few drops | For pumpkins |
| Green Food Coloring | Few drops | For monsters |
| Metallic Sprinkles | 2 tbsp | For staples and shine |
| Mini Peanut Butter Cups | 6–8 | For Frankenstein bolts |

Glaze:
- ½ cup powdered sugar
- ¼ tsp vanilla extract
- 1 tbsp milk
- Food coloring (orange, green)
Substitutions
- Candy melts instead of glaze for brighter tones
- Vegan butter and marshmallows for plant-based version
- Chocolate frosting in place of piping gel
- Pumpkin spice mixed into base for fall flavor
Step-by-Step Halloween Rice Krispie Treats Instructions
Learn how to decorate Halloween Rice Krispie Treats step by step with simple glazes, frosting, and candy eyes for spooky fun.
- Prepare the Glaze
First, whisk powdered sugar, vanilla, and milk until smooth. Then divide into two bowls, coloring one orange and one green. This step ensures your bars have bold seasonal hues.
- Mummy Treats
Begin by attaching two candy eyes with frosting. Next, pipe crisscrossed frosting strips to mimic bandages. As a result, the eyes peek through, creating a spooky-cute effect.
- Monster Treats
Spoon green glaze unevenly over two-thirds of each bar. While still wet, press multiple candy eyes in place. Consequently, every monster treat looks unique.
- Frankenstein Treats
Spread green glaze, then add two eyes. Afterward, pipe jagged hair, a stitched mouth, and scars. Finally, attach peanut butter cup bolts with glaze and sprinkle metallic accents for staples.
- Jack-o’-Lantern Treats
Fully coat the bar with orange glaze. Then pipe black triangles for eyes and nose, plus a jagged smile. Moreover, adding candy eyes gives extra character.

Pro Tips for Halloween Rice Krispie Treats
- Always test glaze consistency before decorating
- Cut rectangles instead of squares for clean designs
- Double the batch if making for a large group
- Tint the marshmallow base for extra festive flair
- Decorate close to serving time for freshness
- Use piping bags instead of plastic bags for neat lines
- Add sprinkles before glaze hardens to ensure they stick
- Pair with Halloween Mummy Hot Dogs for a kid-friendly menu
Variations & Substitutions
- Gluten-free: Choose certified GF cereal
- Vegan: Plant-based butter, marshmallows, and frosting
- Budget swap: Chocolate chips instead of sprinkles
- Flavor twist: Add cocoa or spices to the base
Serve It With
- Pumpkin spice latte for cozy sipping
- Halloween Pumpkin Pizza for a savory pairing
- Warm apple cider to complement the sweetness

Storage & Reheating Halloween Rice Krispie Treats
- Keep the treats sealed in an airtight container at room temperature, and they’ll stay fresh for about two days.
- Do not refrigerate; cold storage hardens the bars
- Freeze undecorated bars for 1 month, thaw, then decorate
- According to the USDA, desserts with frosting should remain out of unsafe temperature ranges
- The FDA reminds consumers to check candy labels for allergen safety
- The NIH highlights limiting added sugars for better overall health
Nutrition (per serving, approx.)
- Calories: 190
- Fat: 6g
- Carbohydrates: 32g
- Sugar: 18g
- Protein: 1g
FAQs
They remain soft for 2 days at room temperature in a sealed container.
Yes. For example, peanut butter and honey can replace marshmallows as the binder.
Overheating marshmallows or storing in the fridge often causes hardness. Instead, use fresh marshmallows.
Yes. However, add final decorations shortly before serving.
Not always. Although rice is gluten-free, many cereals contain malt flavoring. Look for certified GF versions.
More Like This
- Graveyard Pudding Cups – Spooky no-bake dessert kids love
- Cookie Monster Cupcakes – Playful, kid-friendly cupcakes
- Witch’s Brew Cocktail – A magical Halloween drink for adults
- Black Velvet Cake – Dramatic and delicious Halloween cake

Halloween Rice Krispie Treats Recipe
- Total Time: 25 minutes
- Yield: 12 servings
- Diet: Vegetarian
Description
These Halloween Rice Krispie Treats transform a nostalgic childhood snack into a festive centerpiece with four spooky designs: mummies, monsters, Frankenstein, and jack-o’-lanterns. They’re quick to prepare, no-bake, and endlessly customizable. Perfect for parties, school events, or family fun nights, these decorated bars combine crunchy texture with playful frosting and candy details that kids and adults both love.
Ingredients
Rice Krispie Treat Base
- 2 batches Classic Rice Krispie Treats, cut into rectangles
For Decorating
- 1 cup vanilla frosting (for mummy bandages)
- Candy eyes, assorted sizes
- 2 tbsp black piping gel or black icing
- Few drops orange food coloring
- Few drops green food coloring
- 2 tbsp metallic sprinkles
- 6–8 mini peanut butter cups
Glaze
- ½ cup powdered sugar
- ¼ tsp vanilla extract
- 1 tbsp milk (add more if needed for consistency)
- Food coloring (orange and green)
Instructions
- Prepare the Glaze:
In a medium bowl, whisk powdered sugar, vanilla, and milk until smooth. Adjust thickness with a few drops of milk. Divide glaze Split the prepared glaze into two separate bowls, coloring one with orange and the other with green. - Mummy Treats:
Attach candy eyes with frosting. Using a piping bag fitted with a flat tip, pipe crisscrossed frosting strips across the bar to resemble bandages, leaving the eyes visible. - Monster Treats:
Spoon green glaze unevenly across two-thirds of each bar. While glaze is wet, press multiple candy eyes into the surface for a fun, spooky effect. - Frankenstein Treats:
Spread green glaze evenly, then add two eyes. Pipe jagged black “hair,” a stitched mouth, and scars. Use metallic sprinkles for staples and attach peanut butter cup “bolts” to the sides with extra glaze. - Jack-o’-Lantern Treats:
Coat each bar with orange glaze. Pipe triangles for eyes and nose, and a wide jagged mouth. Optionally add candy eyes inside the face for extra character.
Notes
- Glaze Alternative: Swap with melted candy melts for brighter, bolder colors.
- Dietary Options: Use vegan butter and marshmallows for a plant-based version.
- Flavor Twist: Add pumpkin pie spice to the marshmallow base for a seasonal variation.
- Storage: Seal the treats in an airtight container and leave them at room temperature; they will stay fresh for about two days. Avoid refrigeration, which hardens the bars.
- Prep Time: 20 minutes
- Cook Time: 5 minutes
- Category: Dessert
- Method: No-bake
- Cuisine: American
Save This Recipe for Later
In addition, you can pin, share, or comment with your favorite spooky design so that more families enjoy Halloween Rice Krispie Treats together.