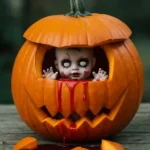
Description
This creepy DIY Zombie Baby Pumpkin Carving is the ultimate Halloween centerpiece. A baby doll bursting out of a pumpkin, complete with guts and fake blood, makes for a terrifying yet hilarious decoration. With simple tools and affordable supplies, anyone can create this unforgettable Halloween project in under an hour.
Ingredients
- 1 medium or large pumpkin (preferably misshapen for creepiness)
- 1 baby doll (thrifted or budget-friendly)
- 2 tbsp white face paint (for eyes)
- 1 tsp white or neutral eyeshadow (to set paint)
- 1 tsp purple or black eyeshadow (for zombie effect)
- 2–3 tbsp fake blood (or ketchup/syrup alternative)
- 1 carving knife
- 1 glue gun (optional, for reattaching limbs)
- 4–6 toothpicks (optional, for securing doll)
- Pumpkin guts and seeds (saved from carving)
Instructions
- Prep the Doll – Paint the doll’s eyes with white face paint. Set the paint with neutral eyeshadow, then add dark shadow around the eyes for a sunken, zombie effect.
- Carve the Pumpkin – Cut an opening where the doll will “burst out.” Scoop out the inside, leaving some guts for dramatic effect.
- Insert the Doll – Push the doll into the opening. If necessary, detach and reattach limbs with toothpicks or a glue gun for positioning.
- Decorate with Guts and Blood – Arrange pumpkin guts around the doll’s exit point. Drizzle fake blood for a gory finish. Display immediately for best effect.
Notes
- Variations: Use glow sticks inside the pumpkin for an eerie glow.
- Substitutions: Replace fake blood with syrup or red paint.
- Shelf Life: Lasts 2–3 days; keep outdoors in cool weather.
- Kid-Friendly Version: Skip fake blood and use paint only.
- Prep Time: 20 minutes
- Cook Time: 0 minutes (non-edible craft)
- Category: Halloween Craft / Decoration
- Method: Carving + Assembling
- Cuisine: American